The Orbital Rant
I've completed both of these games. Don't do it. It's not worth it.
0. Introduction
Recently, I've been playing all of the Art Style and Bit Generations games. They were a total of nineteen games released on Nintendo consoles (seven on the GBA, seven on the DSi, and five on the Wii), almost all of which were developed by Skip, Ltd. They're all*Except Boundish. You don't have to bother with Boundish. very good games, and I recommend you play all of them. I do not recommend you BEAT all of them. Do not beat all of them. Don't do it.
Now, there are a couple of games that you should beat. The games I had the most fun with when 100%ing them are:
- Dotstream (GBA)
- Light Trax (Wii)
- Digidrive (GBA)
- Digidrive (DSi)
- Base 10 (DSi)
- Soundvoyager (GBA)
Play these games. These games deserve to be beaten. As for the rest of the games, you should still play a good bit of them. You might have more fun than I had (I think Rotozoa is fairly good, but some people enjoyed it way more than I did). There are, however, two exceptions. Two games that broke me. Two games that did not deserve to have taken up so much of my time.
Orbital (GBA) and Orbient (Wii).*Orbient is the North American and European name for the Wii game. In Japan, it's also called Orbital. For simplicity, I'll be referring to the Wii game as Orbient.
These games lull you into a false sense of security. They're accursed, and should not be played for more than ten minutes. They appear like a fun game, but if you play them for more than 30 minutes, they will tear you to pieces.
(Orbient is a sequel to Orbital. I should clear that up. Everything I say about Orbital can also be applied to Orbient.)
I. The Skies
The title screen seems innocuous enough; a blue flash, the title of the game, and "PRESS START" pulsing on the bottom of the screen. Continuing on, you see an array of six galaxies, and are instructed to SELECT GALAXY. You only have access to one of them; you can't move the cursor off of it. Selecting the galaxy, you see 5 stages available; while you can only select the first one, it's obvious that each galaxy contains five stages, and that there are six galaxies in all.
You start STAGE 1, and a small gray planet flies across the screen. There are a couple other larger planets around, all of which are red. There's also a couple of blue planets, which are about the same size as you. The camera follows the initial gray planet, implying that you control it. Sure enough, you hold the A button, and start moving towards the closest larger planet. You hold B, and are repelled away from it. You orbit around the planets for a while, having a good time.
At some point, you make a mistake and crash directly into a big planet. You lose a life (of which you initially have 5 of), and are shot away right back where you came from. The blue planets catch your eye; maybe you're supposed to collect them? You run into a blue planet on a whim, and sure enough, you absorb it. You hear a chime, and your planet suddenly grows bigger. One of the other red planets, the smallest one, turns blue. The other blue planet now turns gray. The objective becomes clear: consume the planets to grow bigger. You continue to do so, until you hear a small, celebratory tune play. Another one of the red planets, which looked noticeably different before, is now pulsating yellow. You try to collect it, but crash into it and are sent back. What do you do with it?
At some point, you try consuming a smaller, gray planet. It simply gets absorbed with nothing to give. However, at some point, you barely miss grabbing one. Remember, your only controls are to attract to and repel from nearby planets; you can't just move wherever you want. The controls feel clunky, but are just intuitive enough to allow you to be reasonably sure of your inputs. Regardless, the gray planet you missed grabbing starts orbiting you. You've captured it as a satellite, and a new music track fades in. You try again, and sure enough, you have a second gray planet orbiting you. Curious, you try capturing the yellow planet as a satellite -- you hear a triumphant jingle, and the screen fades out, showing just you and your satellites. Lines of text slowly fill the screen:
Shortly after, all of your satellites disappear, one at a time, being converted into 1 extra life each. Then, STAGE 2 begins. It looks similar, but the stage layout is different. There's a massive planet with several planet-dotted spokes coming out of it, along with another planet that is moving around the large planet. Your goal is the same, but the journey is not. Again, you absorb the blue planets and collect the gray ones; soon after you're onto STAGE 3.
By this point, you discover something interesting: if you spend enough time within a certain radius of a planet, you start orbiting it. When you do so, you move around the planet automatically; attracting and repelling now just take you towards and away from the planet, regardless of any other planets nearby. As soon as you leave the radius, you get taken out of orbit and can attract and repel to other planets.
You continue on for several more stages this way. STAGE 3 is various planets scattered about, STAGE 4 has a line of moving planets that you have to weave in between, and so on.
STAGE 5 introduces something interesting; a vertical line of planets that doesn't seem to end. If you haven't already figured it out, it soon becomes obvious that the stage loops around; if you go off to the right, you reappear on the left, and same in all directions. The stage isn't too difficult, but the game seems to be ramping up in difficulty. But if this is all you need to do to beat the game, it doesn't seem that bad, no?
II. The Surface
By the time you're ready to capture the goal planet on STAGE 5, you notice something that wasn't there before: a small yellow moon wedged in between two of the planets. You try to capture it, but bumping into it simply knocks it away, never to be seen again. Undeterred, you proceed onto STAGE 6, which is nothing more than a randomly assorted array of planet clusters. You see the moon again, this time in a spot just next to the goal planet. You try to collect it again, but miss, ready to try again. But instead, the moon orbits you like a satellite, and the music changes to a soft lullaby-like tune. Curious, you beat the stage, only to then notice something odd about the results screen:
The realization dawns on you; beating each stage isn't all there is to it. You have to get the moon in each level if you want to complete this game. For now, though, the moons seem easy to get; they're a fun little challenge. You begin to work your way through the levels, grabbing all the moons you can (though you still miss a couple of them every now and then). The stages go by quickly:
- STAGE 7 is a series of two-planet systems.
- STAGE 8 is a big planet with increasingly distant orbiting bodies.
STAGE 9 has two main components: one, a dense array of randomly-arranged planets. But secondly, and more importantly, a moving asteroid clump. You pay no attention to them, assuming them to just be another type of planet. But then, you slip; you're being sent directly into the asteroid clump. Having been in this situation before, you hold the repel button.
Nothing happens.
You can't push or pull from asteroid clumps, but you can very much still crash into them. This is when the difficulty of the game starts to increase, and it can all be contributed to the fine folks at Skip, Ltd. who decided to make objects that go against the fundemental concept of the game. Despite this, you remain calm, unaware of the horrors that are yet to come:
- STAGE 10 places its large asteroid clumps right next to the pickups.
- STAGE 11 requires you to juggle your orbit around some asteroid clumps.
- STAGE 12 has a hilariously unrealistic spinner made of planets.
- STAGE 13 features an orbital conga line.
- STAGE 14 is laid out like a cloverleaf interchange.
- STAGE 15 has planets orbiting planets orbiting planets.
- STAGE 16 introduces new visuals for the planets, and plays a bit like a ski slalom.
- STAGE 17 actively discourages you from orbiting a planet.
- STAGE 18 features two asteroid clumps with a planet in between.
- STAGE 19 is a massively confusing triple-orbit setup.
- STAGE 20 is an endless checkerboard of asteroid clumps*The new visuals introduced in STAGE 16 actually make the asteroid clumps look more like rings. They're still asteroid clumps, though, and will continue to be referred to as such. and planets.
- STAGE 21 features a DNA-shaped helix of stationary planets.
- STAGE 22 requires an increasingly precise series of slingshots.
- STAGE 23 has an unconfortable majority of moving objects.
- STAGE 24 features a series of planet walls.
- STAGE 25 has a humongous planet and asteroid clumps within.
- STAGE 26 is laid out like a zipper; half the planets move up, the other half move down.
- STAGE 27 is two planets with a conveyor belt in between.
- STAGE 28 features the return of the orbital conga line.
- STAGE 29 is a dark glimpse into the effects of Kessler Syndrome.
- STAGE 30 has a big planet orbiting a huge planet orbiting a massive planet which has multiple smaller planets orbiting it.
After beating STAGE 30 (in no small part aided by the massive amount of lives you've accumulated), the screen fades out, and instead of showing a new stage number, simply says ENDING. You watch the credits roll, excited to have beaten all 30 stages in the game. You haven't gotten all the moons yet, so you decide to go back to the stage select after the credits finish. When you do, however, you notice something. Something that wasn't there before.
A seventh galaxy.
Your heart skips a beat. The game had massively ramped up in difficulty; surely there can't be more stages, right? You select the brand new galaxy, confusedly awaiting its contents. The game provides five brand new levels, and the stage name simply reads:
EXTRA 1
III. The Depths
All five stages are unlocked; you're free to tackle them in any order. They can't be that bad, right?
EXTRA 1
EXTRA 1 features about five or six planets, one of the collectable ones being on the other side of an infinite column of asteroid clumps. There are two ways to get past it: either weave through a spinning gap about as big as you are, or going through a ludicrously fast revolving door of clumps. Pick your poison; it doesn't matter too much. What does matter is getting back. You have to do the exact same thing except harder to get to the goal planet. And this is only the first extra stage.
EXTRA 2
STAGE 13 is the introduction of the orbital conga line. STAGE 28 features its brother. But EXTRA 2 has no ordinary conga line. This is the home of the Orbital Conga Line: With A Vengeance. One of the only pickups in the stage is inside the grasp of the fiendish line, and it's extremely difficult to get inside considering the fact that it moves at about the same speed you do (with only a small gap to fit into). And still, once you get the pickups, the gap becomes extremely unaccomodating. The only consolation is that this is the only obstacle in the stage.
EXTRA 3
The first thing you see in the level is a planet orbiting at what may as well be the speed of light. Do not be fooled by it, for it is simply a distraction. The real meat of the stage is in its center: four planets, all orbiting the same asteroid clump, moving in different directions, constantly intersecting and passing through eachother, with pickups orbiting around and placed within. This is an affront to physics as we know them, for it merely believes the laws of physics to be mere suggestions.
EXTRA 4
Have you ever used a Spriograph? It's an old kids toy that featured gears rotating around more gears to produce some wacky symmetric drawings. This is what would happen if a Spirograph became sentient and evil. I can describe the stage very succinctly: there is a small asteroid clump, being orbited by a bigger clump, which is orbited by a bigger clump, which is orbited by a massive planet. They all rotate at different speeds. As soon as you try to predict what the thing will do, you're immediately proven wrong.
EXTRA 5
There are too many things in this level. There's a total of ten asteroid clumps and eleven planets, all packed together into the area of a single screen. Absolutely none of the planets are safe to orbit, leaving your only option to try and not crash into the massive asteroid clumps littered absolutely everywhere. Two of them are even spinning. This level is a minimalist's nightmare. And to give a quick indicator on how difficult these levels are, this took me no less than an hour of combined playtime to even beat, let alone get the moon wedged in the middle of the whole thing.
Despite overwhelming odds, you perservere. You start off by just beating all the stages to begin with; you don't get anything for doing so, so you rightfully assume these to be the final challenges of Orbital. You stick with the difficulty, mastering the physics, and eventually working your way to getting every single moon in all 35 stages. It's over. You're done. You look at the screen, excited to see if the game rewards the sheer effort you put into the game. Instead, you are met with two words that will strike fear into anyone:
FINAL 1
IV. The Abyss
You're no longer playing a game. You are in Hell, and Hell is in space. After getting all 35 prior moons, you're immediately thrown into FINAL 1 with little to no warning, and something immediately strikes you: the physics are all weird.
You see, FINAL 1 features a massive planet with everything orbiting around it. You're used to this; it's not like this is fundamentally different than STAGE 2. But there are also five more planets that completely ignore the rest of the stage, moving around wherever they please, whether they pass through a planet or not. You start the stage right next to them, and you find it nearly impossible to pass them while moving upwards.
Gravity in Orbital is strange. Against expectations, there is actually no way to speed up or slow down. You're constantly moving at the same speed, and "repelling" and "attracting" only change which direction you're going, not the speed. If you're orbiting a planet, this speed is relative to the planet you're orbiting.
Imagine a spinning disc. Follow a specific point on the disc, and note its speed. While the disc is rotating at the same speed, points near the center of rotation move slower than points near the outside. Orbital actually lets you experience the inverse of this concept: the further you are away from a planet, the longer it takes to orbit it. And since you move at a constant speed relative to a planet you're orbiting, you can actually "slow down" your orbit by nearly leaving it.
But here's the thing about speed: it's always relative to something. If you're standing still on the surface of the Earth, you're not moving relative to its surface. If you're driving down the highway at 100 km/h, it means you're moving at 100 km/h relative to the surface of the Earth. But if there's another car next to you, then it's not moving relative to you. Even if you're in space, you're still moving relative to something (e.g. the solar system if you're just outside of Earth's orbit).
Orbital disagrees with this. If you're not inside the orbit of any planet, you still move at a constant speed; this speed is relative to.. nothing. The stage itself is the frame of reference. And when I referred to "stationary" and "moving" planets earlier, I meant that they're not moving relative to the stage.
The planets in FINAL 1 are moving very quickly relative to the stage. In fact, they're moving at the same speed you are. This means that if you try to speed up to pass a planet, you simply don't. It looks like you aren't moving (since you and the planet are moving at the same speed, from your perspective, they're not moving). This causes the physics to be absolutely horrendous. The only way to maneuver around these planets is to either orbit one of them (since you start moving at a constant speed relative to the planet, you can go around it just fine) or to go so far away from the planet you end up at the other side (since the stage loops around). This is horrible in practice, and I firmly believe the only way to beat the stage is by accident.
This is only the first FINAL stage.
FINAL 2
Have you ever heard of a "kaizo level"? If you've seen some harder Super Mario Maker or Super Mario World stages, you've probably heard the term before. If you haven't, a "kaizo" level is a stage that is meant to use standard game mechanics in such a way that the resulting stage is incredibly difficult, often to the point where a single obstacle can take as long to beat as an entire regular level. Because they're so difficult, game developers almost never make them themselves. They're usually reserved for mods (e.g. SMW) or community created content (e.g. SMM).
FINAL 2 is a textbook example of a kaizo level.
You start FINAL 2 flying into the stage, immediately sent into orbit around a planet. You can see the first planet you need to absorb just out of reach, so naturally you exit orbit and collect it. You then hear the jingle that signifies that the goal planet is now available to be captured. That planet you were orbiting at the start of the level is the only regular planet in the stage. The stage is comprised of that planet, the planet you just absorbed, the goal planet, and ten asteroid clumps. In order to beat the stage, you have to take an extremely wide orbit around the starting planet, go through a -- no joke -- near-pixel-perfect gap in order to get the moon, and continue on your trajectory in order to capture the goal planet.
This is the only thing there is to do in the level. It took me just under half an hour to figure out how to do it.
FINAL 3
Remember my whole rant earlier about relative speed? Well this stage just kicks it up to 11.
You begin the stage orbiting a planet moving to the right fairly slowly. Just above your planet is another one identical to the first one, moving right slightly faster than it. Above that planet is another one moving even faster. Above it is another, faster one. This continues for eight planets, and to the left of the eighth one is the goal. There's also an asteroid clump moving faster than the eighth planet just below you (the stage loops, remember?), so there's no chance you'll ever go down directly to the goal. And even if you could, there's pickups on the fourth and sixth planets.
This, on its own, is... fine. The main way to beat the stage is to exit each planet's orbit at its peak, and due to the weird physics in this game, you're flung incredibly fast directly into the orbit of the next planet. This is made more difficult by tiny asteroids inbetween each planet, but it's still fairly doable. But if you thought that was the end of it, the moon in this stage is placed near the second planet, so you have to go back where you came from, and then back again in order to complete the stage. And because each planet's moving incredibly fast, if you ever crash into anything, you're way more likely to lose all of your lives in quick succession than you are to re-enter orbit.
This is my favourite FINAL stage. Not because I like it. It's because I dislike it the least.
FINAL 4
Remember how I said FINAL 2 is a textbook kaizo level? If that one's the textbook example, this one's the final exam question that you didn't study for.
You begin this stage right in the middle of an asteroid field. There's so many asteroid clumps that you can't tell where they start and where they end. And in the center of the clump is a regular planet, and the goal planet tucked away in a tiny alcove. You're very clearly meant to grab a pickup (you can see it just below the whole thing), enter orbit, and snag the goal planet. You know this because they placed a tiny, singular asteroid in the orbit of the planet, so the only way you could ever go that way is if you've already beaten the stage. You probably haven't discovered this yet, but as soon as you beat the stage, you become invincible while the animation finishes. And you have to abuse that here.
You exit orbit (you have to, otherwise you're flung into that lone asteroid), grab the pickup, and sure enough, the goal planet opens. But the moon is placed on the top of the whole thing, not the bottom where you just exited. In order to get the moon, you have to take the widest orbit known to man around the whole thing, grab the moon by going in, orbit the wrong direction about the center planet (mind you, the gap is so tight that you'll probably crash if you don't hug the planet), exit again, go around again, and enter the orbit in the correct direction. And if you mess any of this up, you just kinda have to hope you can still beat the stage. Absolutely nothing else in the game could have prepared you for this.
FINAL 5
This is the final FINAL stage. You know that factoid that nearly 100% of space is empty? This stage is the opposite. About 80% of the stage is planets, and you have to try to navigate around them. If you're ever not in orbit, all of the planets tend to pull on you equally, leaving you with little to no control. This is an issue, because the last planet you need to absorb is both in empty space and right next to an asteroid clump.
This is the final boss of Orbital. You have to master the gravity, master the controls, take note of the orbiting asteroid clumps within, and put every ounce of effort into beating this stage. I don't have much to say about it, because it's so difficult it's hard to properly explain.
And just like that, you're done. After five of the most greuling stages in video game history, you've finally completed 100% of Orbital. There are no more stages, just another credits sequence, ENDING', with some strange music to accompany it.
You've completed 100% of the game... but only 50% of the series. If you remembered, this game had a remake on the Wii.
V. The Second Surface
Orbient doesn't begin with a title screen. Instead, you're met with a file selection screen. You select the first one, and make a new file. You then see that the game was nice enough this time around to provide you with a tutorial. It's not super in-depth, but it teaches the mechanics as good as it needs to. You're then met with a title screen that's only three letters off from being identical to Orbital's. The galaxy selection screen has been rearranged; you're now met with the same six galaxies arranged in a vertically elongated hexagon, and you use the pointer to select a galaxy. Selecting STAGE 1, however, you see that it is nearly identical to Orbital's STAGE 1, with a couple more moving planets. After all, this game was a remake -- why would the stages be fundamentally different than its predecessor?
You make your way through the stages much faster than before. Things are going super smoothly, right up until STAGE 13. For you see, STAGE 13 introduces the Black Hole.
If you're anywhere close to the black hole, it will start attracting you towards it, regardless of whether you're attracting or not. (You can still repel off of it just fine, but it's harder to do so). This, on its own, is a fine mechanic. It helps to add some new variety to the stage design, which is nice. But the fine folks at Skip, Ltd. thought that this was too easy. If you crash into anything in a stage, you simply lose a life, are ejected back out, and become invincible and unable to absorb/capture anything up for a few seconds while you regain your bearings. But if you crash into a black hole, you lose a life and restart the stage. No matter how far you were in the stage, you're immediately sent back to the beginning. This is, naturally, horrible if you do it at the end of a stage. It's only a minor threat for now, but it'll come back later.
The rest of the regular stages are largely unchanged. The overarching layout is usually the same, sometimes with a few minor tweaks. The only noticeably different stage in this one is STAGE 30, which features five planets in a quincunx with some black holes dotted inbetween. It's not super difficult, though.
You sit through the ENDING again, which is noticeably less flashy in this version. But this time, you're prepared for the fallout.
As if it was foretold, the seventh galaxy appears. This time, it appears on the left of the screen; if there were an eighth galaxy on the opposite side, the planets would form a perfect diamond. You start EXTRA 1, ready to re-experience the suffering from Orbital... but there's one key difference. A giant black hole appears in your view. You don't recognize the stage from before.
EXTRA 1 is an entirely new stage.VI. The Second Depths
They can't be that bad, right?
EXTRA 1, AGAIN
EXTRA 1 isn't the same as before. The stage is shockingly empty: two big planets, and a supermassive black hole. If it could, this black hole would swallow the other planets instantly. Unfortunately, you have to go right into the belly of the beast -- all of the pickups you need to grab are dotted around the black hole, not the planets. You'll spend the entire stage dancing inches away from starting the stage all over again. The stage isn't too bad... but it's not exactly good!
EXTRA 2, AGAIN
Did you think the Orbital Conga Line was over? Because this stage is... an exact copy of EXTRA 2 from Orbital. They re-used this stage. I don't have much to add, since it's just EXTRA 2 again. Get used to this, because a lot of these extra stages are re-used. Don't think you'll get off easy because of this, though...
EXTRA 3, AGAIN
This stage is weird. There's a massive ring, littered with asteroids, collectibles, and planets; inside of it is your starting planet, and also this massive planet that completely disrespects the stage layout and just travels in a straight line through everything. There's also an asteroid doing the same maneuvers, as if it wasn't bad enough. Navigating this stage proves extremely tricky, as you can imagine.
EXTRA 4, AGAIN
This one is just EXTRA 1 from Orbital. I've already made my thoughts on it clear enough.
EXTRA 5, AGAIN
You start the stage flying into a completely empty screen. This is short-lived, however, since a massive ring formed by 20 individual planets soon eclipses your view. Inside of it is -- you guessed it -- five more planets, and the smallest of the collectibles. Whether you like it or not, you're going to have to deal with the gravitational pull of 25 planets, all at once, and attempt to weave through them in order to grab all of your collectibles. 7.8/10 too many planets.
You're halfway through the bonus stages! This game's going by much quicker. All you have left is the FINAL stages, and then you're good to go! You're thrown into the next stage, which, of course, is FIN--
EXTREME 1VII. The Second Abyss
Surprise! There are even more stages in this one!
EXTREME 1
If you thought the black hole in EXTRA 1 was menacing, you're not ready for this one. This stage is laid out fairly similar to it... but there are none of the larger planets to fall back on. There is only the black hole (and its orbiting collectibles), and you're going to become more acquainted with it then you were ever prepared for. There's even some tiny asteroid clumps thrown in, as well! How fun!
EXTREME 2
This one's just Orbital's EXTRA 3. But this time, it comes back with a vengeance. There's now a black hole added into the middle of the... catastrophe, and you'd best be ready to restart this stage against your will. Not even the reused stages are safe from the unstoppable terror of Orbient.
EXTREME 3
If you're familiar with the other Art Style games, you might have heard of Rotozoa*You should actually go play that one. It's pretty good.. If you haven't, this stage's design will make far less sense. The goal planet this time is part of a massive construction, featuring five 2-planet tentacles that shoot out of it, and a corresponding amount of asteroid clumps. This is all compressed into what many would consider to be "too close". If you haven't already figured out the gravity of this game, get ready for a game of cosmic pinball -- where you're the pinball.
EXTREME 4
It's Orbital's EXTRA 4 again. But this time, they thought it'd be real funny to put some planets in the orbit of the arm. It's hard enough to predict where the arm ends up -- let alone where the planets orbiting it. There's no real strategy that I can recommend.
EXTREME 5
Remember Orbital's FINAL 5? The one with little to no breathing room? This is an even worse version of that stage. It's genuinely impossible to put yourself in a position where you're not in orbit and not about to crash into the oncoming swarm. Some of the planets are even moving this time, which means that you can never stop and think -- it's now or never for the whole stage.
I apologize for skimming through a lot of these stages. They all have a lot of depth (for better or for worse), and have much more to them than the sentences that I put on this page. Regardless of that, though, it's over. You sit through ENDING' again, which is (again) similar to the first one. You've beaten the EXTRA stages, the EXTREME stages -- what could possibly come next? I sure hope it's not something with such an aura it put me off playing the game for days at a time!
The ninth galaxy appears in the top left of the selection screen. Hovering over it provides a simple one-word clue: MERCILESS.VIII. Purgatory
You're in Hell, and Hell takes the form of a WiiWare game. By this point, the game is done pretending that it's just a game meant to be enjoyed by all; the sheer aura that this galaxy radiates is enough to send a very clear message: this game is out to get you, and it's not going to stop until you're ten meters into the ground.
Or... is it? Four of these stages are actually re-used from Orbital. MERCILESS 1 is the only original stage, and the other four are from Orbital:
- Orbient MERCILESS 2 is from Orbital FINAL 2
- Orbient MERCILESS 3 is from Orbital FINAL 1
- Orbient MERCILESS 4 is from Orbital FINAL 4
- Orbient MERCILESS 5 is from Orbital FINAL 3
It's no use talking about those four stages; they were the hardest stages in Orbital for a reason. And the fact that this game isn't close to done before throwing them directly at you shows that it is a force to be reckoned with. There is one new stage, however, and I can't do this game justice without talking about it.
MERCILESS 1
You start the stage orbiting a planet, as is the norm. But the other planets... don't seem to follow suit. You're being attacked on all sides by a Cirque du Soleil-worthy performance by no less than six other planets; they all follow highly elliptical orbits, never crashing into eachother, but moving in such a pattern that you'd be crushed to death instantly if you were to ever leave the tight, safe orbit that you start out in.
But it wouldn't be much of a stage if you sat around doing nothing, eh?
This stage demands perfection from you; you have to snag a collectible from the orbit of one of the perfomer planets, then come back into the center of the whole thing where you started to grab the second collectible, then consume one of the two smaller orbiting planets. And you have to do this without missing a beat. You have to be perfectly in sync with the planets, ready to catch whatever they throw at you, and have to go above and beyond to get the moon (located, again, right in the center). I truly wish there was more gameplay of this available, because it's truly a sight to behold.
As for the other four stages, they're not as much of a spectacle. Since they're reused from Orbital, they're nothing you haven't seen before. That doesn't stop them from being annoying, mind you; no matter how many times you play the stages, they'll still come back to bite you.
Is it really a surprise as to what comes next?
The tenth galaxy appears in the top right, this time. All together, the galaxies form the rough shape of a shield. These stages leave you with only one parting message: FINAL.IX. Despair
The Devil called, and he wants his job back.
As fortunately as it can be, the first two stages are, again, reused. FINAL 1 is Orbital's EXTRA 5*It really goes to show how hard that stage was, eh?, and FINAL 2 is Orbital's FINAL 5*It's worth mentioning that it was given a very slight buff, in the form of some extra stationary planets. Nothing major though.. That's right -- the final stage of Orbital, which might as well be one of the most difficult things Skip's ever made, is the second of five in this set. I'm not going to sugarcoat it: there's nothing I can say that can adequately prepare you for this.
FINAL 3, AGAIN
This stage starts off extremely strong by throwing you right in the middle of three black holes. Orbiting those black holes are all of the pickups, and next to them are some larger planets that you can use to maneuver. This sounds fair, right up until you look a little further. This entire stage is wrapped in a shell of asteroids, and the shell takes no prisoners. It's akin to a boa constrictor; it squeezes the stage super close that if you aren't moving around with perfect precision, you're not only going to lose your lives, you're going to restart the stage. About half of this stage's difficulty comes from the fact that you're orbiting close to the black holes for about 80% of the entire stage (more if you go for the moon).
FINAL 4, AGAIN
A lot of these extra stages have their difficulty come from placing a handful of obstacles in spots that make them harder to navigate than if they were placed individually. This stage does not do that, for it was forged in a factory that just happened to be mass-producing asteroid clumps. Your first goal is to head upwards and to absorb a tiny planet wedged right into the innermost orbit of a large planet. Unfortunately for you, there are eighteen tiny asteroid clumps, in six rings of three, all spinning in opposite directions inside the orbit of the same planet. The outcome is an experience only comparable to what I can imagine performing a lane change on a busy highway is like, in that it's probably not very fun, nor is it not dangerous. But as if this wasn't enough, that's only the first pickup in the level. You first need to, well, get out of the planet you're currently orbiting (and quickly, lest you run into a rogue asteroid!), and then head upwards to another planet. There's nothing in its orbit, but surrounding it are a handful of planets that are the rest of the collectibles you need to grab. Unfortunately, orbiting the collectibles are tiny asteroid clumps, so you have to weave through them several times in a row. This is a good time to remind you that you can't push or pull off of asteroid clumps, so any adjustments you make must be against the large planet of which these clumps are orbiting. And as if the level designers weren't feeling sadistic enough, they decided to completely surround the goal planet with asteroid clumps, making the final pickup needlessly diffult.
FINAL 4. This was FINAL 4.
FINAL 5, AGAIN
I genuinely think that this is the hardest stage to properly describe, in that it's the only stage that had every single part of it maliciously designed to kill you. This is a genuine obstacle course -- there's no more freeroaming, for the developers have set you an objective that you need to fulfill. I'm going to do my best to describe this stage, but the only way you can properly experience it is through this map of the stage, which I had to make myself because I simply could not comprehend it otherwise. Here goes...
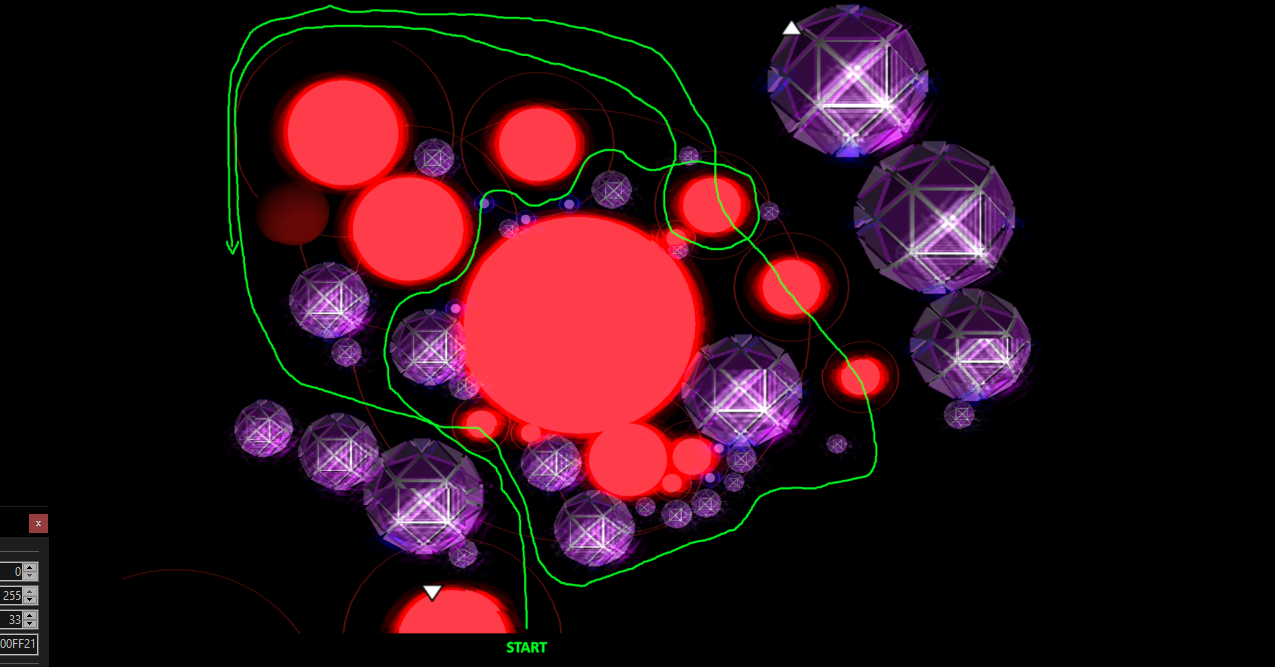
You begin the stage orbiting a lone, moderately large planet. The camera soon reveals that said planet orbits a Wipeout-level obstacle course, and you'd better hurry if you want to make it in the entrance. After weaving uncomfortably close to a giant asteroid, you finally enter the course, which takes place largely inside the orbit of a humongous planet. The course begins, and the first obstacles lull you into a false sense of security. You squeeze through a tiny gap, repel to weave through a carved path, pass by a tantalizing collectible, and time another repel to just barely collect the first pickup. You pass by a few identically-sized planets (which you're now free to collect as satellites, if you dare to try and do so), duck below another planet and above an asteroid, and you soon see the first big obstacle: three asteroids orbiting a planet, of which the next pickup you need to grab is wedged between the planet with the asteroids and the massive planet home to the whole course. More importantly, the asteroids are orbiting in a direction such that you need to exit the orbit of the massive planet, then re-enter the orbit of the other planet, and go all the way around to grab your prize.
You're not done yet, though! If you were to hold steady, things would go south very quickly. You now need to exit both orbits of both planets, and then travel the other way around the whole thing, taking a super wide orbit in order to avoid a mountain of planets (one of which is the goal!). You then go back into the path you took when you first started the course -- if you remember the very first gap you had to squeeze through, the planet causing it is now the next one you need to absorb. You then have to take a super sharp turn out of orbit yet again, and maintain velocity until you've rejoined the course on the opposite side, where three more planets in ascending size are ripe for absorption. There's a slight problem, though -- the third one is the one from earlier with the three asteroids orbiting it. And unfortunately for you, they're not as open to being consumed*This is the only part of the course which I am genuinely stuck at; I have no clue how you're supposed to get past here without losing any lives..
Once you get out of that, you're almost home free. All you need to do is climb the mountain again, and just past its peak is the goal planet.
That's what I would have said if that was all there was to it. The moon for this stage sits tantalizingly in orbit, and it's no less than a herculean effort to find a spot where you're able to safely grab it. This stage alone is probably where at least 1/3 of my suffering came from, and I've had it built up for weeks whilst writing this blog post. You have no idea how happy I am to finally get this off my chest.
X. Conclusion
It's over. You're done. ENDING'' plays shortly after the completion of your mission, and its... uniqueness sets in*Quick backstory: the music for ENDING and ENDING' are soft, calming, space-like tunes. ENDING'' takes a different approach.. Other than that, it's not very remarkable compared to the two endings that came before it. What is remarkable is the knowledge that you've beaten every single stage Orbital and Orbient had to throw at you.
Is there a moral to this story? For me, I don't really think there was. I set out to do something stupid, and by God did I get my fair share of it. I talked... a lot of smack about these games, but I definitely need to mention that this was only my experience. You might have a better time than I did; all of the Art Style games are good in their own merits, and these two are no exception. And even if you don't end up liking Orbital/Orbient, there's still seventeen other games for you to try*Need some recommendations?
I'd recommend Base 10 (DSi), Rotozoa (Wii), Dotstream (GBA), its sequel Light Trax (Wii), Soundvoyager (GBA), and Digidrive (GBA/DSi).
Or if you want some more formulated opinions, here's a good review of all 19 games.! As for Orbital and Orbient, I have only a few closing words on them:
Do I recommend playing these games? Of course I do! I had a lot of fun with the initial stages, and I bet that you'll probably have the same.
Do I recommend beating these--
No.